

Confessions of a Professional Organizer: A Look Inside My Actual Pantry and Tips for Organizing Yours
- Emily Santos
- 8 hours ago
- 6 min read
Here is my confession: my pantry makes me really happy. Like, it is basically making my middle-aged dreams come true.

I realize that may sound a little odd. After years as a professional organizer, I know I am the weird one here — most people have bigger dreams than an organized pantry and do not spend their weekends rearranging their closets and cabinets for fun. But hear me out.
For years, before we remodeled our kitchen, we had very little storage space upstairs. The majority of our food lived in our unfinished basement storage room, next to our bikes and camping equipment. I am a home organizer who spends my days creating beautiful, functional systems for other people, and yet, for a long time, I was walking down a flight of stairs just to grab a box of pasta or extra snacks for my son and his friends.
So when we remodeled and I was able to have all of our food in one place, it was a genuine thrill. I finally had the chance to apply my own process to my own kitchen. Now when I open my pantry, I feel a little burst of joy every single time.
But a pantry is not always joyful. In fact, it can be one of the most difficult areas in your home to keep organized. Everyone in your family uses it, you have to make space for new items every single week, and no matter what size it is, it always feels too small. But it doesn't have to be that way.
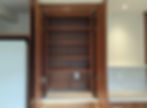
Whether you have a sizable walk-in pantry or you are making it work with a few upper cabinets like I did for many years, here is a look inside my actual pantry, along with four practical tips on how to organize your pantry so it stays that way.
Table of Contents
Tip 1: Start with a Clean Slate — and Toss the Expired Stuff
If you want to know how a professional organizer starts a pantry organization project, the answer is always the same: we take everything out.
Empty the pantry of all food and non-food items. If you store food in other places in your kitchen, empty those cabinets and drawers as well. You need everything in one place to see exactly what you are working with.
As you pull things out, categorize them in a way that makes sense to you. Dispose of any food that has expired as you go. If you notice that you have a high volume of expired items in a specific category — like three half-empty bottles of specialty vinegar or five boxes of stale crackers — make a note of it. This is useful information that tells you what to buy less of in the future.
Tip 2: Don't Assume Things Will Go Back Where They Were
Once everything is out, it is tempting to just put it all back in the same places. Resist that. This is your chance to really look at each category — how big is it, how often do you use it, and where in your pantry is the most natural home for it?
When I was setting up my new pantry, I wasn't sure where I was going to fit my spices. In our old kitchen, they lived in a drawer, but I didn't have drawer space that made sense for spices in the new layout. Instead of forcing them into a spot that didn't quite work, I followed my own process — categorizing everything first, then evaluating the space — and realized they could fit perfectly on a short shelf using a turntable. The solution was right there once I stopped assuming the old way was the only way.
Frequency of use should drive placement. What you reach for every day belongs in the most accessible spot. What you use once a month can live on a higher shelf or toward the back.

Tip 3: Wait to Buy the Bins and Baskets — But Do Buy Some
I completely understand the desire to buy organization containers at the beginning of a project. It feels productive. But trust me, it will save you time and money if you save that Amazon order or trip to The Container Store until the end. Knowing exactly what you have and where you are going to store it before you shop means your bins and baskets will actually fit. Plus, you may discover that you already have enough containers on hand and don't need anything new.
That said, some organizing supplies make a real difference in a pantry. Here is what I use in mine:
Fido glass jars for dry goods like flour, pasta, rice and dried fruit. These are the same style my mom used — in fact, some of mine are 30 years old and were hers. They are airtight and it's easy to see the contents at a glance without labels. You can find them at The Container Store.
iDesign Linus deep turntables for any smaller items or for things you only have one of like condiments. I used them for spices and I specifically like the deep style because things don't fall out when you spin them. Also available at The Container Store.
The Container Store multi-purpose bins for grouping larger categories together. In my pantry I grouped things like sauces, vinegars, baking and cereals together. I also use these bins all over my house — bathroom, hall closet, cleaning closet — and I move them around as my needs change. They are one of those products that just works everywhere. Find them here.
You do not have to decant everything into glass jars like I do. But a few well-chosen bins or turntables will help you keep categories together and make it easy to tell when you are running low on something.
Tip 4: Always Leave Extra Space in Your Pantry — The Costco Test
When you put your categories back, start with what you use most in the most accessible locations. But here is the rule I consider non-negotiable in kitchen pantry organization: leave empty space in each category, aiming for about 20%. If you pack your pantry to 100% capacity on day one, the system will break the moment you bring home a new box of cereal.
I put my own system to the test right after setting it up with a massive bulk-buy trip to Costco — the first time I had bought in bulk since moving back into the remodeled kitchen. I came home, piled everything on the dining room table, and... was not sure if it was going to fit.
And at first, it didn't fit. But I made a few adjustments: I swapped some sizes of the multi-purpose bins, making the baking and sauces categories larger. I also expanded into one deep drawer next to the pantry and made it a snack drawer. I've now used the pantry for three months and the system works - every item fits, after every Costco trip or grocery run.

Ready to Organize Your Pantry?
Ready to get started? Read my step-by-step guide on how to organize anything if you're ready to organize your pantry (or entire kitchen!) today.
And if you are not the kind of person who wants to spend your free time organizing your pantry, you don't have to do this alone. I help home organizing clients across Seattle turn their kitchens and pantries into spaces they actually enjoy using. You can see some of those transformations in my before and after gallery.
If you'd rather hand this project off to someone who genuinely loves it, I'm here to help. Schedule a free, no-obligation video call to talk about your kitchen, your pantry, or wherever you want to start.